
Take your clickbooq homepage slideshow one step further by creating a cool intro animation for your website.
To see the effect created in this tutorial, visit the clickbooq website of professional photographer, Maris Mezulis (http://www.marismezulisphotography.com). 
To get started, download the Homepage Intro Template, an Adobe Photoshop template in clickbooq’s Support Center. Select three images you want to showcase on your homepage. The template uses three verticals that are 259 pixels wide by 536 pixels tall.
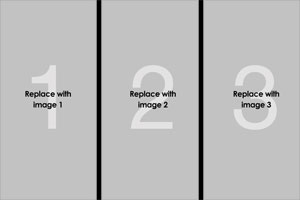
Open the template in Photoshop and replace each layer with your three images, using the image placeholders as a guide. You can also change the background layer color to match your Site Color.
Once your images have been properly sized to fit the template, you can hide all three placeholders by clicking the eye icon next to each layer in the Layers palette. Don’t hide your background layer.
Now you will create three slideshow images for your intro animation.
- Step 1: Hide images 2 and 3, leaving only image 1 visible. Choose Save for web from the File menu and save the image to your desktop.
- Step 2: Hide images 1 and 3, leaving only image 2 visible. Save for Web.
- Step 3: Hide images 1 and 2 leaving only image 3 visible. Save for Web.
Don’t forget to optimize all of your images for the web!
Log into your clickbooq Toolbox and upload the three homepage images you just created. In the Organize section, click-and-drag your newly uploaded images into your Homepage folder. Make sure your images are in the proper order from left to right (ie., the image you created in Step 1 should be first).
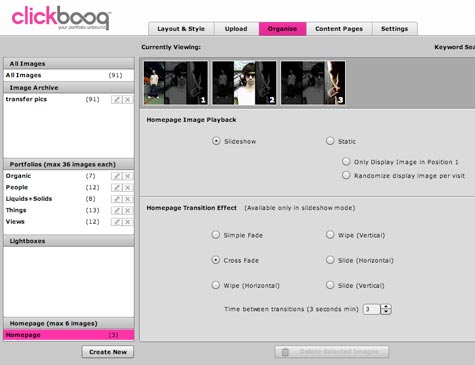
For Homepage Image Playback, select the Slideshow option. Set the Homepage Transition Effect to “Cross Fade”. You can experiment with the amount of time between transitions – there is a three second minimum. Publish your site and open your website in a new browser to see your handiwork!
Advanced Option:
For more advanced Photoshop users, you can create a fade-in, fade out effect. Follow the instructions above until you have replaced the placeholders with your three images. Now, copy your Photoshop file by choosing Duplicate from the Image menu in Photoshop.
In the duplicated file, hide the background layer. Select one of your image layers. Choose Merge Visible from the Layers menu. Choose Image > Adjustments > Black and White and click OK. This converts the Image layer to Black and White. From the Layers palette, change the layer’s opacity to 35% using the slider. Do this for all three of your image layers.
Now, unhide the background layer. Choose Layer > Flatten image from the Photoshop menu. Drag the flattened image back to your original Photoshop file into the appropriate layer (titled “Replace with B&W image”).
Now follow Steps 1-3 from above. Don’t hide your background layer or the B&W image layer. Save each of your images and upload to your Homepage and set your Slideshow settings as directed above.
Again, you can see there are many other options to explore here – you can change the size of your images, create tiled images, and use different gradients and filters on your image layers. And you aren’t just limited to images – you can also explore text and incorporating your logo. Have fun with it!